So I recently sold my 5600x to convert my gaming PC into a server. Why sell the 5600X? Because originally I was going to sell off my RX 6600 as I had no use for it, but then I realized that I couldn’t use the 5600X as a server CPU (well technically I could) as it lacked an iGPU. So I sold the 5600X and bought a Ryzen 5 3400G, which is an APU with integrated graphics, specifically the Radeon RX Vega 11. This allows me to use the server without needing a dedicated GPU, which is perfect for my needs (keeping the power consumption in mind).
Now one might say that I could have tried software like Sunshine or Moonlight to get a GUI working remotely, but you see, I did try it and the experience was not that great. The latency was high, and the performance was not up to the par for my needs. So I decided to go with a dedicated APU instead.
Plus if ever I needed to, let’s say change the OS or anything even related to settings that require a GUI (like BIOS settings), I can’t really rely on Sunshine or Moonlight to provide that level of access.
That’s another reason why having a dedicated APU is beneficial for my server setup.
Now, you might be wondering why I didn’t just use the 5600X with a dedicated GPU. Well, the main reason is that I wanted to keep my server as compact (looking at you, SATA ports) and efficient as possible. By using an APU, I can save space and power, which is essential for a server that runs 24/7.
Thus I got rid of the 5600X as I got a good deal on it and bought the 3400G for a decent price. The 3400G is not as powerful as the 5600X, but it is more than capable of handling my server needs. Plus, it has the added benefit of integrated graphics, which makes it perfect for my setup. Fun fact, my old Pentium G4500 worked fine as well, but I wanted something just a bit more powerful and efficient.
And well I did have the hardware already there, so why not use it? The 3400G is a great choice for my server, and I am happy with the decision to switch from the 5600X.
Enough of this stuff with the CPU, let’s talk about the RAM. I have 32GB of XPG Adata D30 3200MHz RAM in my old setup, which is more than enough for my server, VM and general use.
However, when I switched to the 3400G, I used a program called “Mission Center” that is like task manager in Windows, and it showed me that my RAM sticks were running at 2666MHz instead of the rated 3200MHz. I was confused as to why this was happening, so I did some research and found out that the 3400G only supports RAM speeds up to 2933MHz.
I was a bit taken aback by this, but further research showed that the 3400G can run RAM at 3200MHz, but only if you enable the XMP profile in the BIOS. So I went into the BIOS and enabled the XMP profile, and after booting into my system, it still showed that the RAM was running at 2666MHz. I was puzzled, so I did some more research and watched numerous videos on how to enable XMP profiles on a 3400G, but nothing worked. I tried updating the BIOS but nothing seemed to work.
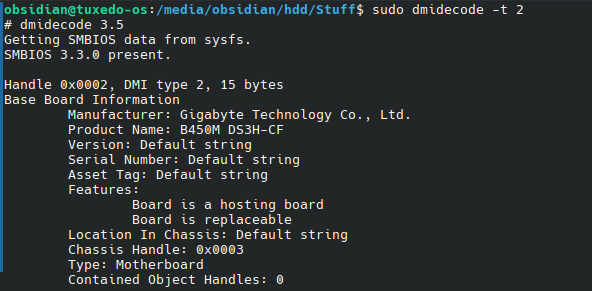
Had forgotten my Motherboard Model…
I even suspected that the CPU’s memory controller is a bit weaker in comparision to the newer Ryzen CPUs, so I thought that maybe it can’t handle the higher speeds. Some people said that having more sticks can cause additional pressure on the memory controller.
I was about to give up when I stumbled upon a forum post that suggested manually setting the RAM speed in the BIOS. So I went into the BIOS again and manually set the RAM speed to 3200MHz, and after booting into my system, it finally showed that the RAM was running at 3200MHz. I was relieved and happy that I finally got my RAM running at the speed it was supposed to be.
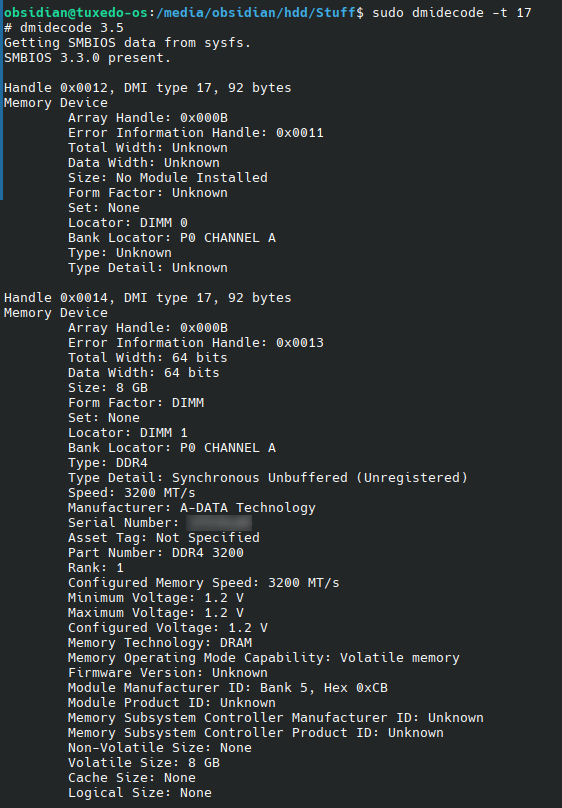
DIMMs working at 3200MHz.
BUT, life isn’t that simple, is it? I noticed that my RAM sticks were indeed at 3200MHz, but they were running at 1.2V and not 1.35V at which they run. Further searching the web and I found that at 1.2V, it runs at CL22, which is very much slower than the rated CL16 at 1.35V.
Checking the RAM Voltage
Now I had to reboot again back to BIOS and set the voltage to 1.35V, and then I had to set the timings manually to CL16-18-18-36. After doing this, the system went into a boot loop. My frustration was at an all-time high, and I was about to give up on the whole thing. But I decided to give it one last shot.
I opened the case and took a screw driver and reset the CMOS by shorting the jumper pins. After doing this, I restarted my system but it was still in a boot loop. I thought, “Why not try with a few sticks of RAM?” [Remember I have 2 8GB sticks and 1 16GB stick].
I just picked one stick randomly and removed it and voila! After 2 minutes, the system booted up successfully. I feared that the 8GB stick that I picked was faulty, so I removed the other 2 and inserted this faulty one. The system again got stuck in a boot loop, so I tried a different slot and it still got stuck. I was in a horrifying situation where in my mind I was thinking that I had to now go through the hassle of RMAing the RAM stick [Remember that RAMs usually have a lifetime warranty] and waiting for a replacement.
But then I remembered my childhood days when the local technician used to tell me that if a RAM stick is not working, try cleaning the gold contacts with an eraser. I thought, “Why not give it a shot?” So I took an eraser and gently rubbed the gold contacts of the RAM stick. After doing this, I inserted the RAM stick back into the slot, removed the 24 pin cable as I had read somewhere that doing that can help plus I removed my GPU to access the CMOS battery underneath it and removed it as well. Then the moment of truth came and I restarted my system. To my surprise, the system booted up successfully! I was ecstatic and relieved that I didn’t have to go through the hassle of RMAing the RAM stick.
I quickly added the other 2 sticks back in and booted the system and went into the BIOS. This time I knew what the problem was. My Cas Latency was NOT 16-18-18-36, so I searched the entire web for my timings but they were littered and not properly documented.
I was already several hours into this ordeal and was tired, but I was determined to get my RAM running at the right speed and timings. A stupid mistake that I had made was that I never even checked the RAM sticks or their boxes, so I went up and got their boxes. I felt like an idiot for not checking them earlier, and there it was literally written “16-20-20”. I had a quick glance on my sticks and ….. well they too had that all along. I felt like a fool for not checking them earlier.
I went back into the BIOS (can’t even recall how many times I have had to do this) and saw that I had to enter 5 timings, but I had only 3. I checked the net again and found that most of the RAMs with such Cas latencies generally have it as 16-20-20-20-38. I dialed this back in and saved it.

Finally got the timings right!
I expected all to work well now but alas, I always get into one problem after the other. The system again got into a bootloop. Atleast this time I knew what to do, and quickly shorted the jumper pins and reset the CMOS. I booted into the BIOS and set the timings to 16-20-20-20-38, but the voltage was still at 1.2V. I quickly changed it to 1.35V and saved it.
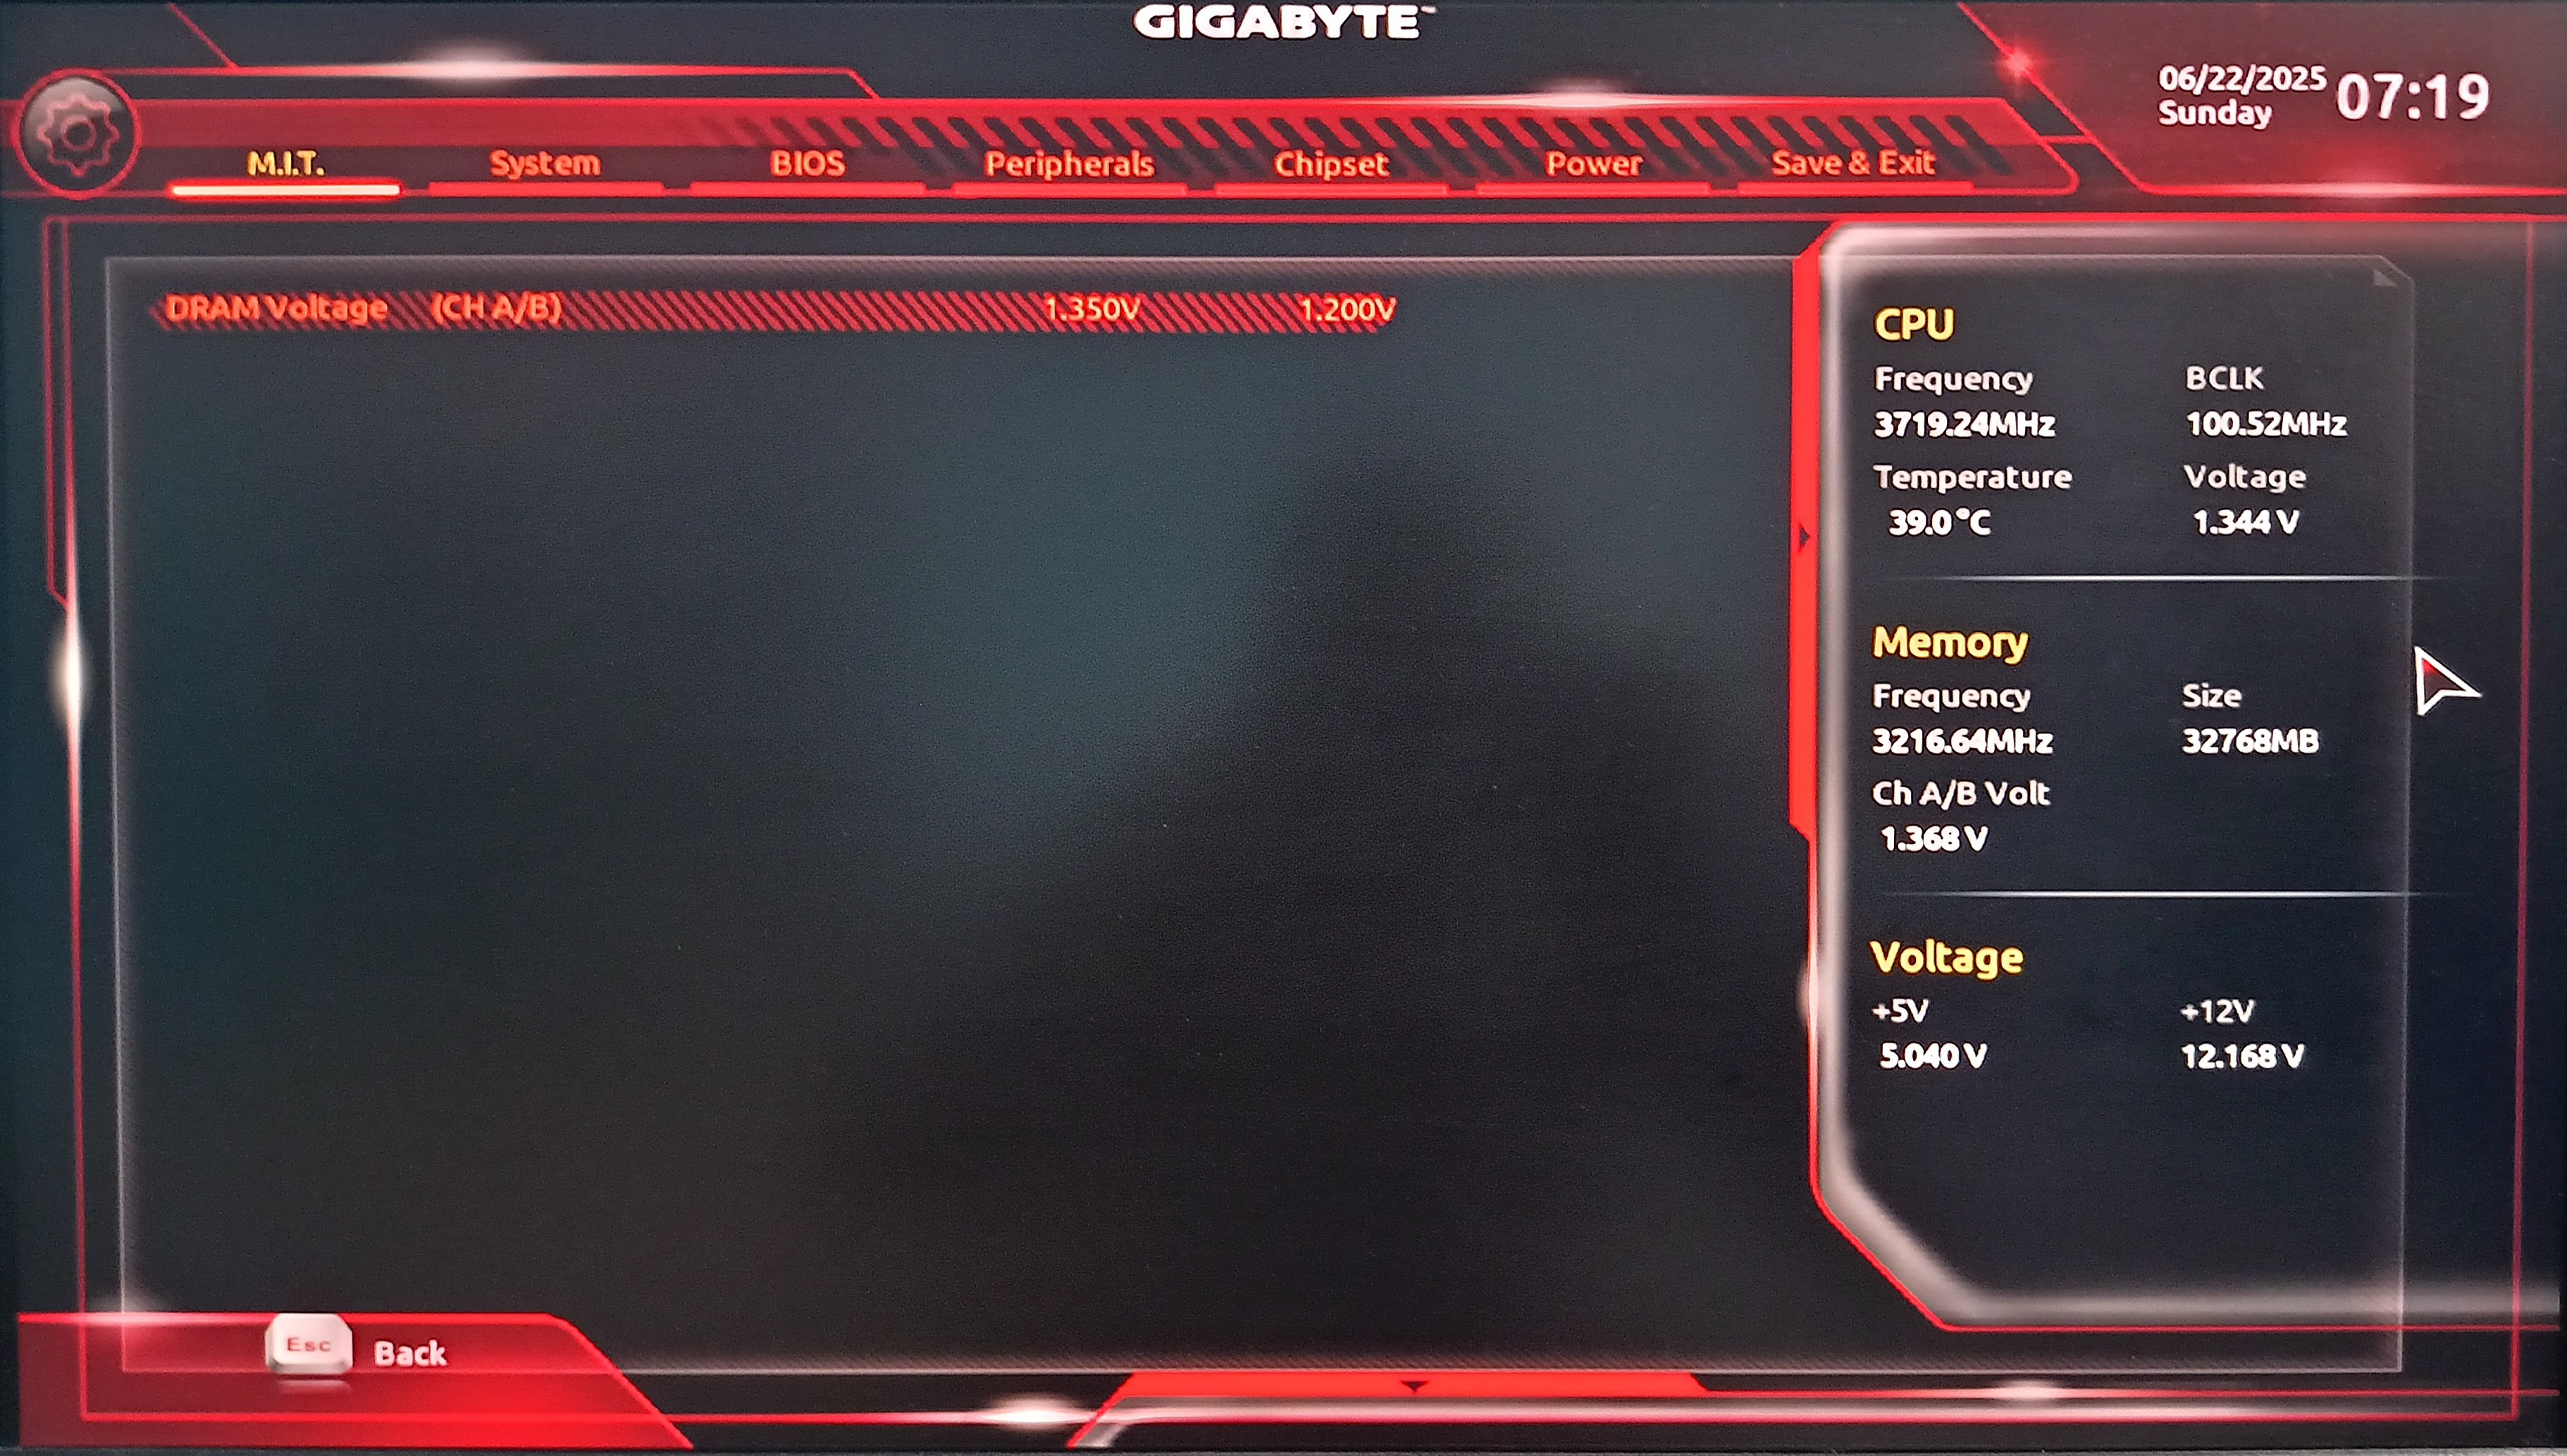
Changing the DRAM Voltage from 1.2V to 1.35V. See the right side panel for the correct readings.
Booted the system and it worked! I was finally able to get my RAM running at the right speed and timings. I was so relieved but it didn’t last longer. I checked the voltage being shown under linux and it still reported 1.2V. I quickly went back into the BIOS and it still showed 1.20V in manual mode under RAM overclock but there is an auto hover panel on the right side in BIOS for quick reference and it did show it to be at 1.35 volts. Further searching the web and it did confirm that this was a bug in the gigabyte BIOS and that it was indeed running at 1.35V (else it wouldn’t boot with those Cas Latencies now, would it?).
But just to be on the safer side, I ran a MemTest86+ using a live boot of linux mint as it has that bundled in the pre boot selection window. After 1 hour was over, it had 1 pass and 0 errors, so everything is perfectly set and I can finally get back to working on building my server.
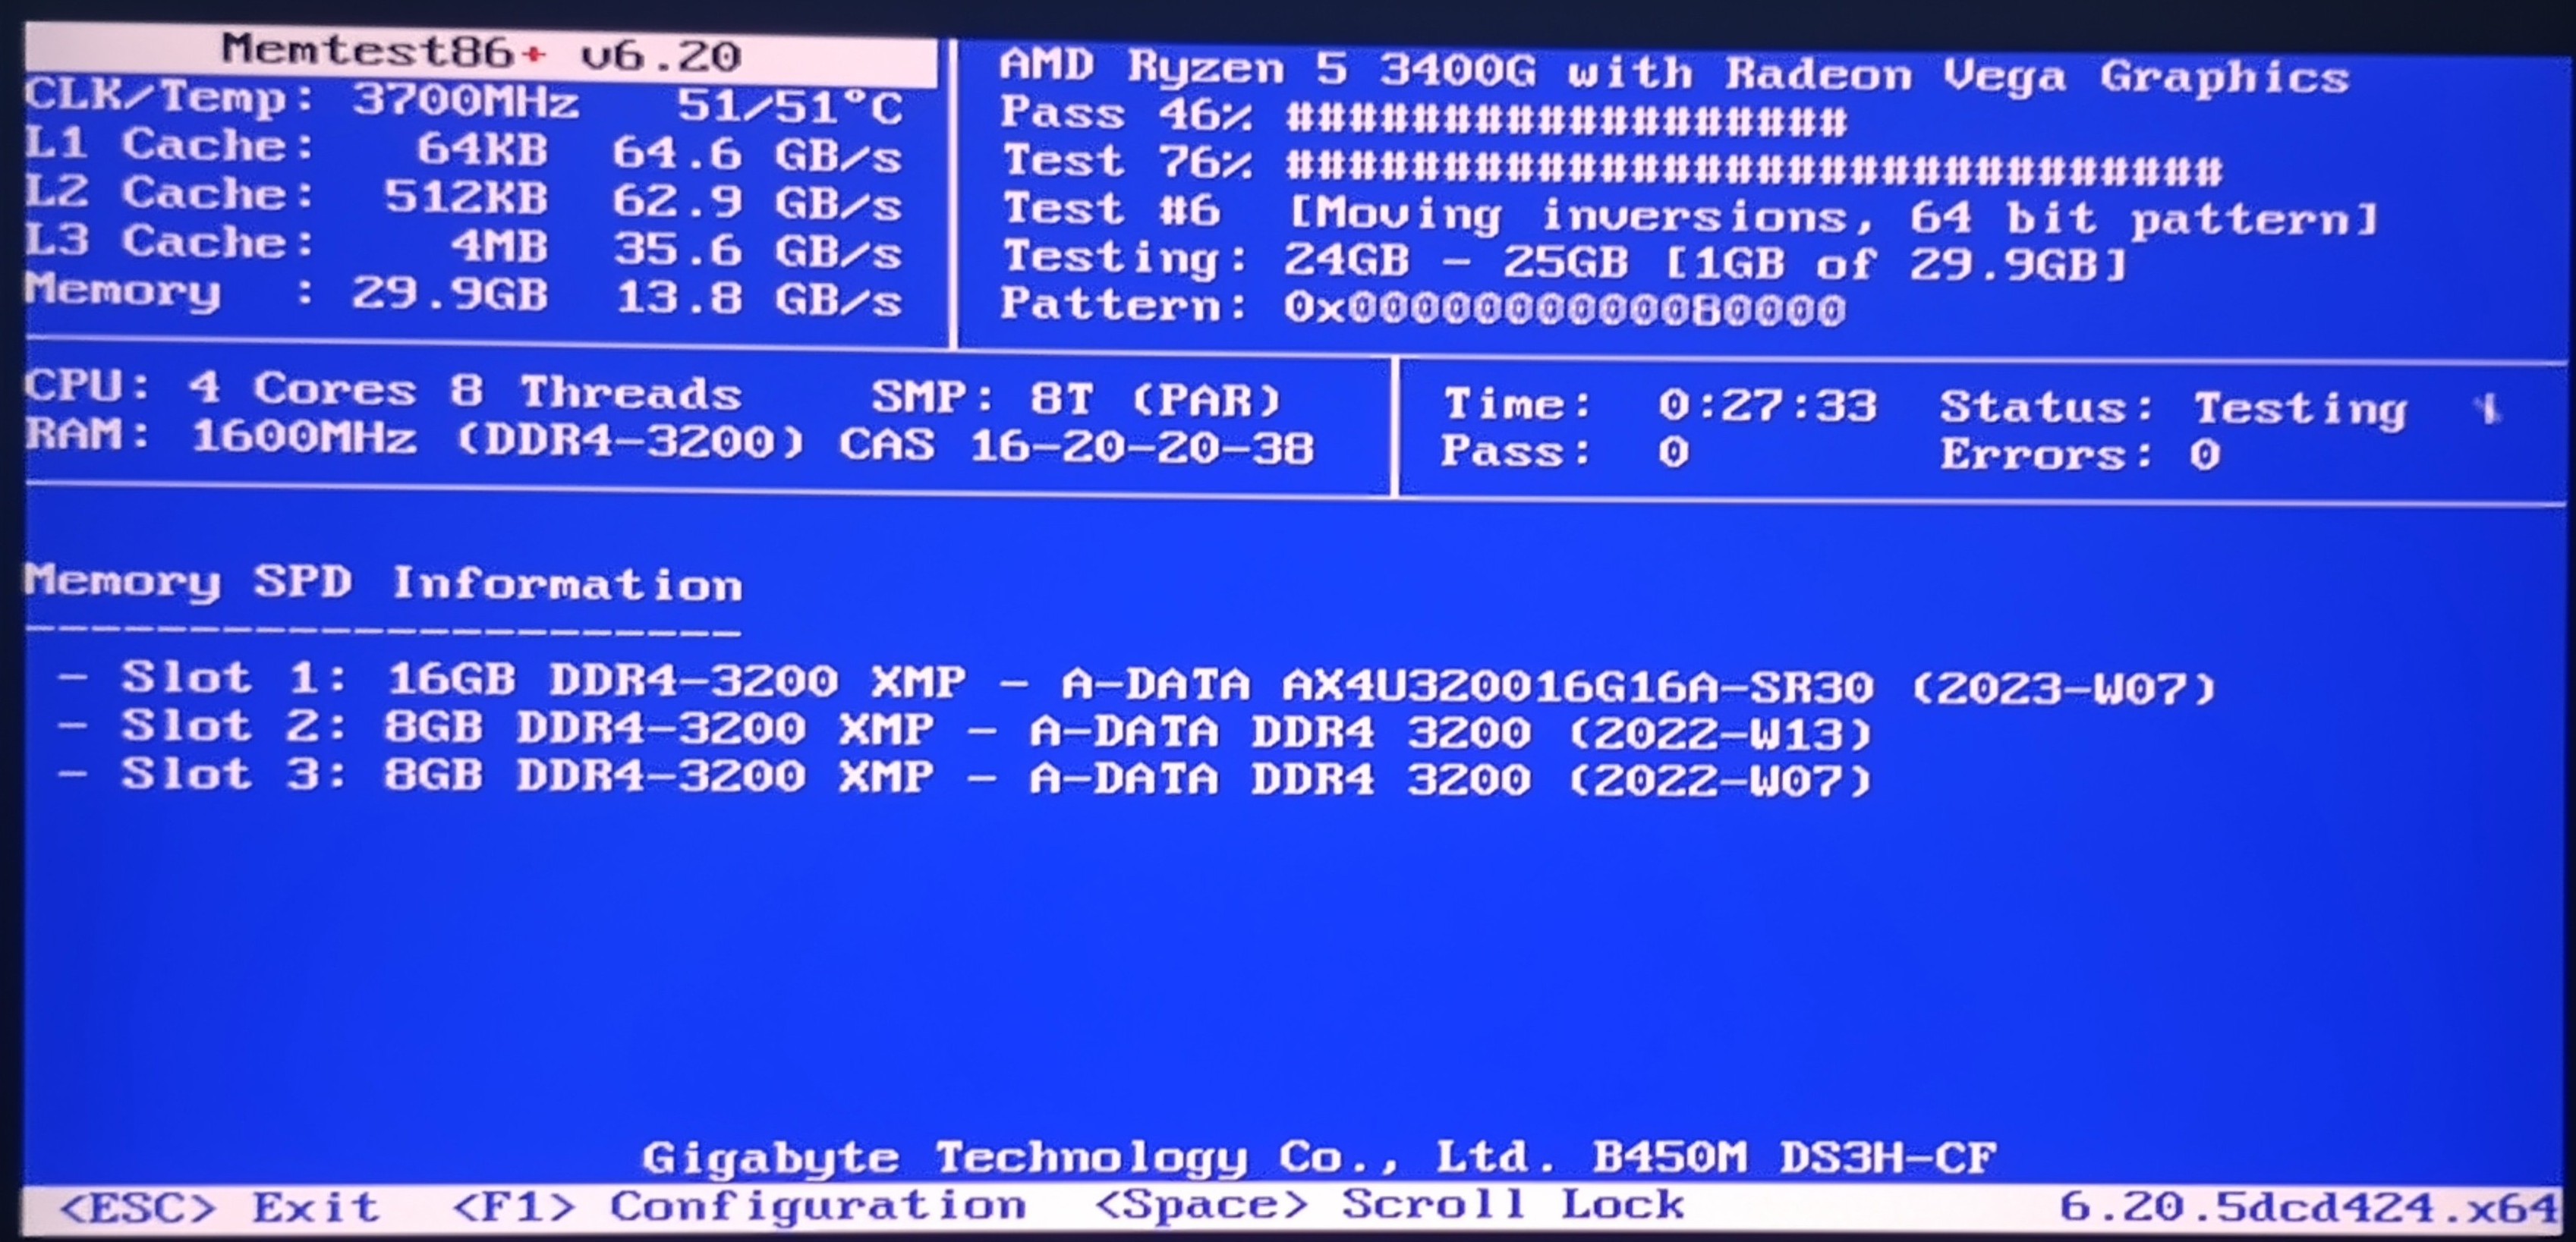
Running MemTest86+ to confirm that the RAM is working perfectly and that there are no stability issues.