If you have been using WSL2 on Windows, you would be quite surprised and satisfied at the same time for how well it works as a Linux CLI.
And so was I, because it allows you the convenience of Windows + the flexibility of Linux systems. It acts as a bridge between the two, and you can run Linux commands on Windows, and Windows commands on Linux.
For this reason, I use it to build custom ROMs for my Android devices. But with Android 15, the system requirements have been upped from 32gb to 64gb, and I have only 32gb of RAM on my desktop.
When I used to run Ubuntu, I used to use ZRAM to compress the memory and this allowed me to build A15. So I thought, why not use ZRAM in WSL2 as well?
But ZRAM is a kernel module, and WSL2 doesn’t have it built into the Linux kernel version 5.15.167.4-microsoft-standard-WSL2. So I had to find a workaround for this.
First I tried modinfo zram, but it returned modinfo: ERROR: Module zram not found. But if you have it listed, try to load it with modprobe zram.
But in my case, I had to build a custom kernel with ZRAM enabled. So I followed the steps below:
- First install the required packages in WSL2 to build the kernel:
sudo apt install build-essential flex bison dwarves libssl-dev libelf-dev cpio bc zstd -y
- Then clone the Linux kernel source code from the official Microsoft repository:
git clone --depth=1 https://github.com/microsoft/WSL2-Linux-Kernel.git
cd WSL2-Linux-Kernel
- Now we must modify the kernel config to enable ZRAM. (But remember not to do so with the provided 6.6 kernel config in Microsoft/config-wsl.config, as that is known to break Docker, if you are using it with WSL2. If you don’t use docker, you can simply copy that to working directory and rename it to .config, else follow as I am doing). Run:
curl -o .config https://raw.githubusercontent.com/microsoft/WSL2-Linux-Kernel/refs/heads/linux-msft-wsl-6.1.y/arch/x86/configs/config-wsl
This gets the 6.1 kernel config that is known to also work with Docker desktop.
- Then let’s fire up the gui based kernel configuration tool:
make menuconfig
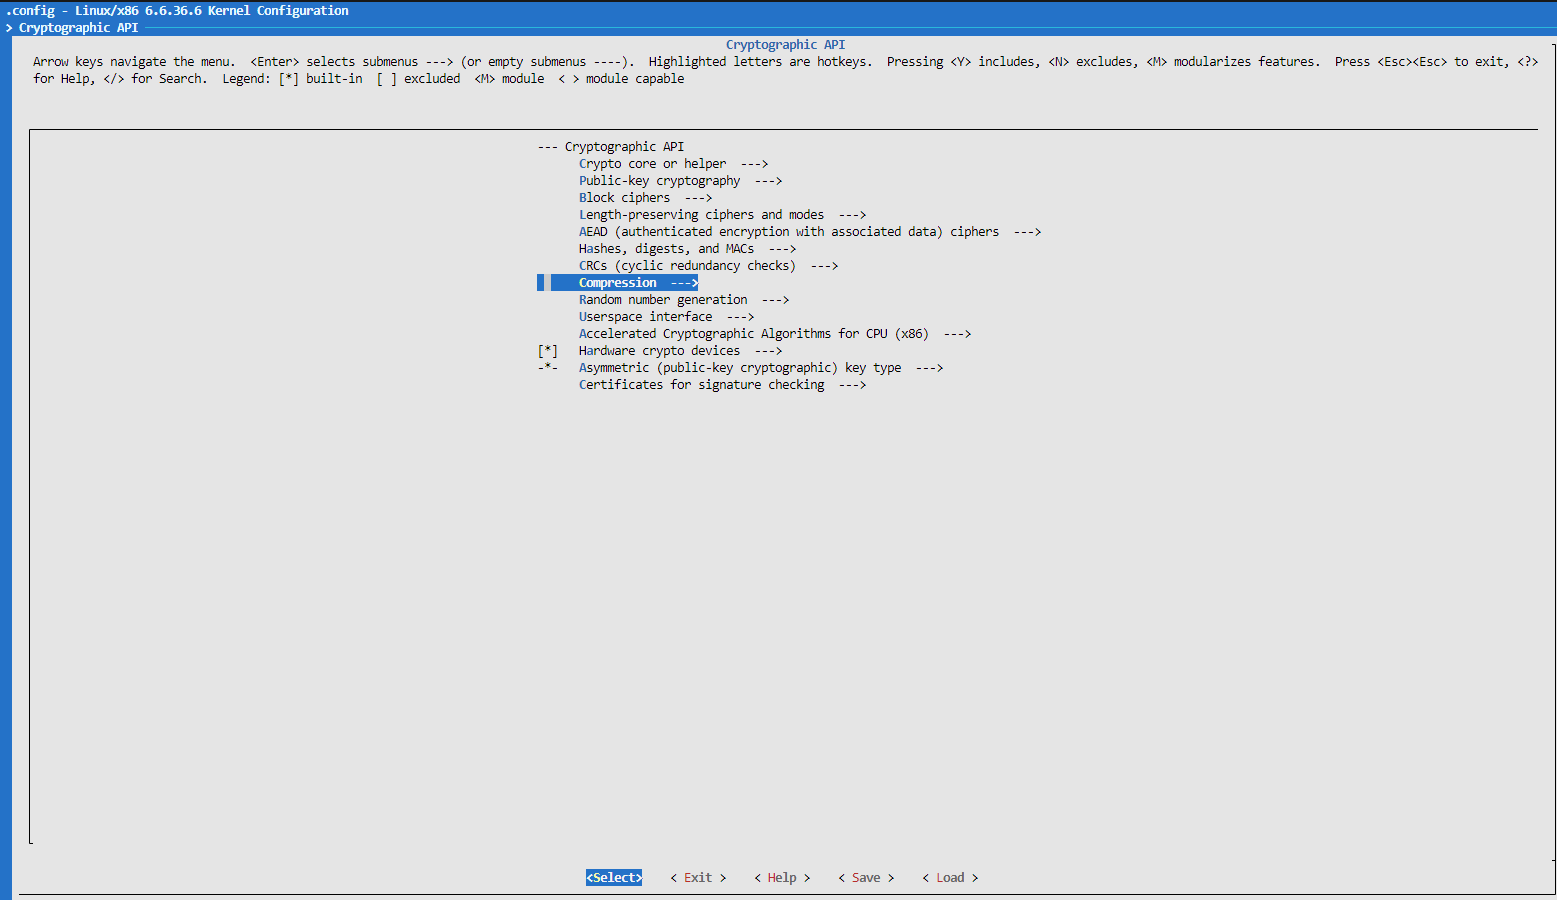
- This should open the menu. Navigate to the following place to enable ZSTD [or any other compression algorithm you prefer]:
Crypto API → Compression → <*> ZSTD compression algorithm
Cryptographic API --->
    Compression --->
        <*> zstd
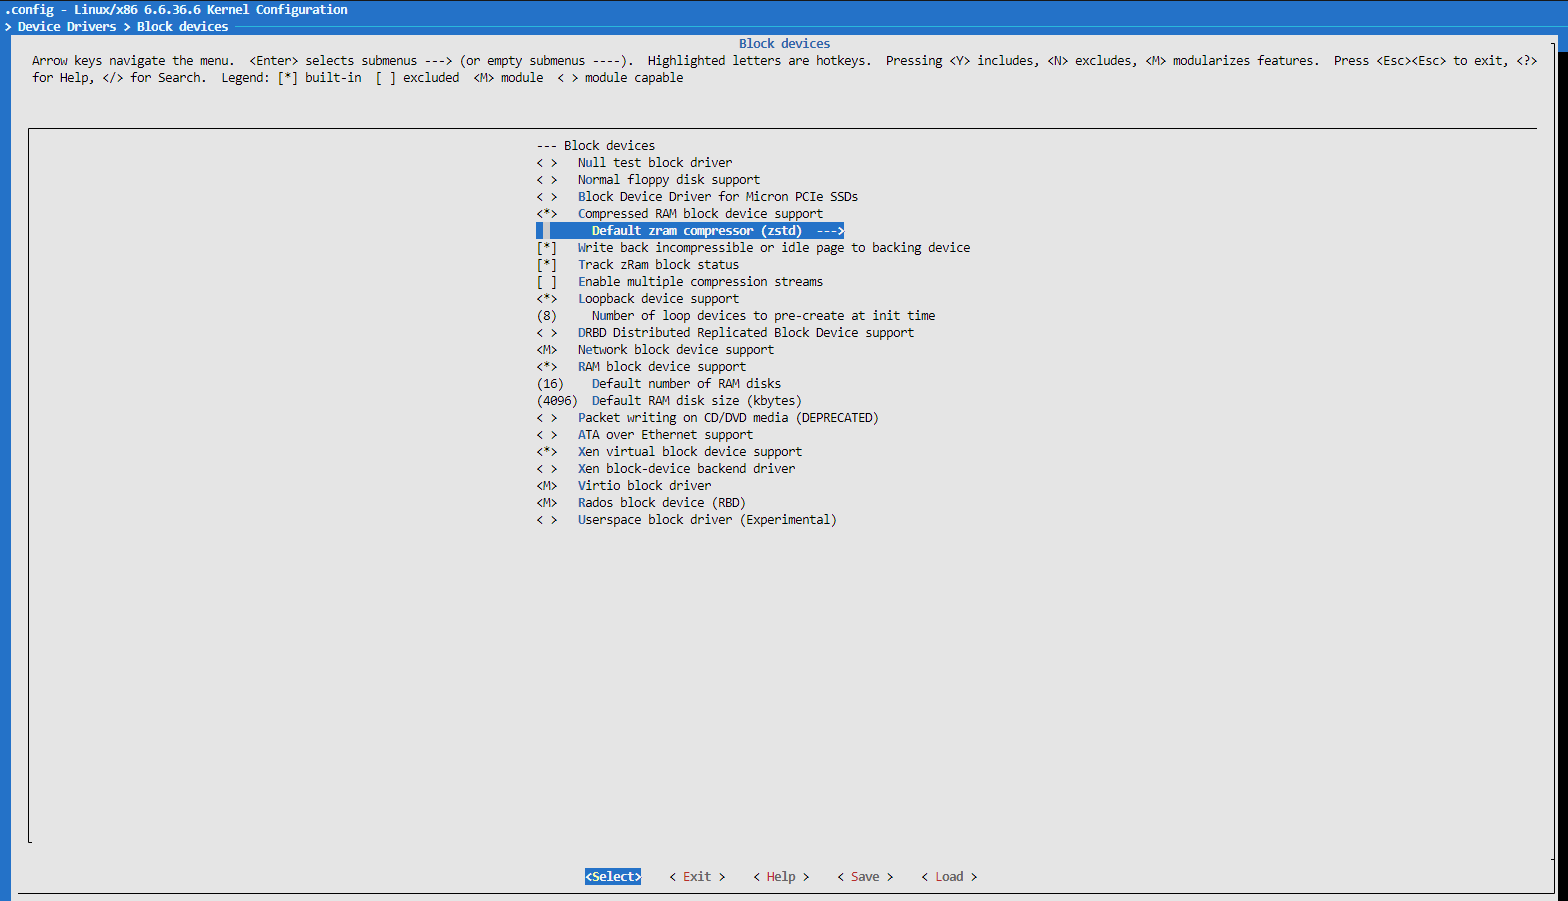
- Go back to the main menu and navigate to the following place to enable ZRAM:
Device Drivers  --->
    [*] Block devices  --->
        <*> Compressed RAM block device support
        [*] Write back incompressible or idle page to backing device
        [*] Track zRam block status
Make sure to Change “Compressed RAM block device support” from M to *, if it was previously set to M. To change it, simply press ‘Y’ at this option. M means a kernel module that can be loaded separately, and ‘Y’ means that it will be built-in. In WSL2 Loadable module support is disabled when using a custom built kernel. We must set any modules to be built-in before building.
- In this same place under “Compressed RAM block device support”, you can also set the compression algorithm via the submenu “Default ZRAM compressor”. I set it to ZSTD.
- Finally save the config from bottom menu panel and exit. Let us now compile the kernel with:
make -j$(nproc)
This will take some time, so be patient. After it is done, we can find the compilled kernel in the arch/x86/boot/ directory. It will be named as bzImage.
- Open the Windows file explorer and navigate to the WSL2 directory where you have the kernel compiled. Then copy the kernel to the Windows directory:
cp arch/x86/boot/bzImage /mnt/c/Users/<Your Windows Username>/Downloads/
Now we can move this image anywhere we want. I created a folder named ‘.wsl-kernel’ in my C:\Users<Username> directory and moved it there.
- The WSL2 kernel must also be overwritten with this new kernel. Simply go to the C:\Users<Username> location and create a .wslconfig file with the following content:
[wsl2]
kernel=C:\\Users\\<Username>\\.wsl-kernel\\bzImage
- Now we have to restart the WSL2 instance. You can do so by running:
wsl –shutdown
wsl
Check the kernel version by running this command to verify that it is the one you compiled:
uname -sr
It should show the latest kernel version that you compiled. For example it shows me Linux 6.6.36.6-microsoft-standard-WSL2.
- Although you have loaded the kernel, if you try checking for the zram module using modinfo, it will still not be there. We must first install the modules we built. Run this from the git repository we cloned:
sudo make modules_install
#Now load them:
sudo modprobe
- If we now check for the zram module, it should be there. You can also check the zram devices with:
modinfo zram
- Now, we must enable zram to be accessible always on boot, i.e., make it persistent. To do so, we must create a systemd service. Run:
sudo nano /etc/systemd/system/zram.service
Add the following content to the file:
###REMEMBER! Change the 1G in ExecStart to whatever size of zram block device you wish to create.
[Unit]
Description=Enable ZRAM Swap
After=multi-user.target

[Service]
Type=oneshot
ExecStart=/bin/bash -c "echo 1G > /sys/block/zram0/disksize && mkswap /dev/zram0 && swapon /dev/zram0 -p 10"
RemainAfterExit=true

[Install]
WantedBy=multi-user.target
Enable the service with:
sudo systemctl enable zram.service
sudo systemctl start zram.service
Now ZRAM should be enabled and working on your WSL2 instance.